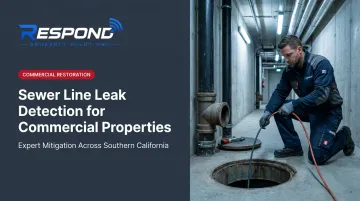
According to the EPA, between 23,000 and 75,000 sanitary sewer overflows occur in the United States annually, caused by line breaks, blockages, aging infrastructure, and defects that allow groundwater infiltration. Commercial properties face disproportionate risk: higher wastewater volume, larger pipe diameters, more complex networks, and the financial exposure of business disruption all raise the stakes considerably.
This guide walks property managers and facility operators through the equipment needed, the three primary detection methods, how to interpret what each test reveals, and when to transition from detection to emergency restoration.
Key Takeaways
- Commercial sewer leaks often go undetected because they are underground or hidden within building infrastructure
- CCTV inspection, smoke testing, and dye/hydrostatic pressure testing each target different failure types — no single method covers everything
- Early detection avoids the cascade of sewage infiltration, mold growth, and structural damage that follows delayed discovery
- Interpreting results correctly matters as much as running the test — minor findings and critical failures require very different responses
- Once sewage reaches building structure or soil, professional restoration should begin immediately — not after repairs are complete
What You Need to Detect Sewer Line Leaks in Commercial Properties
Commercial sewer systems operate under higher load, move greater wastewater volume, and involve pipe networks far more complex than anything in a residential setting. Getting the right tools and access in place before any inspection begins determines whether the findings are reliable or not.
Tools and Equipment Required
| Equipment | Purpose |
|---|---|
| PTZ CCTV camera system (rated for 6"+ pipe) | Interior visual inspection with recording capability |
| Push-rod camera (smaller laterals) | Inspection of branch lines under 6 inches |
| Smoke-generating blower unit (min. 1,800 cfm) | Smoke testing for breach and cross-connection identification |
| Non-toxic smoke fluid or sewer-rated smoke bombs | Smoke medium (must be non-toxic, non-explosive, no residue) |
| Fluorescent dye (non-toxic, biodegradable) | Tracer confirmation of flow path and exfiltration points |
| UV light | Dye detection in low-light areas |
| Inflatable hydrostatic test plugs + pressure gauge | Pipe isolation and pressure integrity testing |
| Moisture meters | Surface confirmation of active moisture migration |
| Full PPE | Waterproof gloves, rubber boots, face shield, liquid-repellent coveralls |
For large commercial properties with deep or wide-diameter sewer mains, contractor-grade robotic crawlers are required. Manufacturers including Envirosight and CUES specify their mainline inspection systems for 6- to 96-inch pipe diameters, which is the point at which push-rod consumer tools become inadequate.
Preconditions and Setup
Three setup steps apply before any inspection begins:
- Identify all cleanout access points — both interior floor cleanouts and exterior street-side access. Missing a cleanout leaves pipe segments untested and can produce false-negative results.
- Schedule inspections during off-peak hours, either early morning or after business close, when wastewater flow is lowest. Active flow dilutes dye tracers, blocks smoke travel, and prevents meaningful hydrostatic isolation.
- Confirm confined space compliance before any entry. Any sewer access point that meets OSHA's permit-required confined space criteria under 29 CFR 1910.146 requires atmospheric testing for oxygen deficiency (below 19.5%) and hydrogen sulfide, plus a trained attendant stationed at the surface.
Methods to Detect Sewer Line Leaks in Commercial Properties
No single method works best in every situation. Pipe diameter, depth, material, and the specific diagnostic goal — locating a crack versus confirming an infiltration path — all influence which approach fits. For complex commercial systems, two methods are often used in combination.
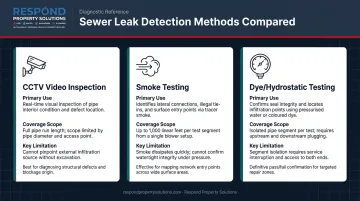
Here's how the three primary methods compare before diving into each:
| Method | Primary Use | Coverage | Key Limitation |
|---|---|---|---|
| CCTV Video Inspection | Locating structural defects | Per pipe segment | Requires clean, accessible line |
| Smoke Testing | Finding surface breaches and cross-connections | Up to 1,000 linear feet | Smoke follows least resistance, not always the defect |
| Dye / Hydrostatic Testing | Confirming and quantifying a known suspect area | Isolated segment | Requires flow shutdown coordination |
CCTV Video Inspection
A camera passed through the sewer line produces a real-time visual record of the pipe's interior. Cracks, joint separations, root intrusion, corrosion, offsets, and collapses are each documented with precise location data — making this the standard method for insurance claims and repair planning.
The process follows three steps:
- Hydro-jet the pipe first if heavy sediment or biofilm is present. NASSCO's CCTV guidelines require the pipe to be clean enough for all defects to be seen and logged — a dirty pipe produces unreliable results.
- Insert the camera at the upstream cleanout and advance slowly toward the downstream end. Pause and rotate the camera head at every joint, bend, or visible anomaly.
- Record with timestamps and distance markers. Document every defect with a screenshot, GPS-tagged location where applicable, and NASSCO PACP severity grade (1–5), defect type, and pipe position.
This method pinpoints exact defect locations and builds a comprehensive pipe condition record. It cannot, however, detect leaks that activate only under pressure or groundwater infiltration that occurs intermittently.
Smoke Testing
Non-toxic smoke is introduced into the sewer system through a cleanout and travels through the pipe network, exiting through any breach, cross-connection, or failed joint — making leak locations visible at the surface or inside the building.
Three steps govern the process:
- Plug the downstream end of the test section to contain smoke within the defined segment. Notify building occupants and adjacent property managers before starting, since smoke may appear inside restrooms or floor drains connected to the line.
- Introduce smoke at the upstream cleanout and run the blower at consistent pressure. Allow several minutes for smoke to fully pressurize the pipe and begin migrating through any breach points.
- Walk the route above the pipe and observe both the ground surface and interior drain fixtures. Photograph every unexpected smoke emergence, noting time, distance from the cleanout, and exit point type.
Per the NASSCO Smoke Testing Performance Specification (May 2021), portable blowers must be capable of at least 1,800 cfm, with central setups able to test sections up to 1,000 feet. Pre-testing notification to residents and emergency services is required — door hangers posted 48 hours to 7 days in advance is the standard.
Smoke testing is fast and cost-effective for large linear coverage, especially for identifying cross-connections, illegal connections, and surface-breach leaks that allow sewer gas to enter buildings. One limitation: smoke follows the path of least resistance and can surface away from the actual defect. Saturated, frozen, or compacted soils can also block smoke migration.
Dye Testing and Hydrostatic Pressure Testing
These two methods are typically used together to confirm and quantify a suspected leak — dye testing traces the flow path visually, while hydrostatic testing measures how much pressure the isolated segment loses over time.
The combined process:
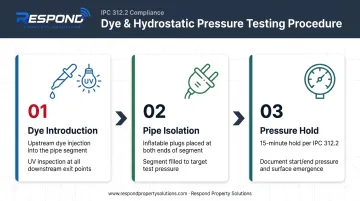
- Dye step: Introduce biodegradable fluorescent dye into the target fixture or cleanout upstream of the suspected breach zone. After the manufacturer-specified dwell time, inspect suspected exit points — soil surface, adjacent drainage structures, building penetrations — using a UV light to detect tracer emergence.
- Hydrostatic step: Isolate the suspect pipe segment with inflatable plugs at both ends. Fill the section completely and bring to test pressure per pipe material rating and local code requirements.
- Hold pressure for the required duration. The 2024 International Plumbing Code Section 312.2 requires a minimum 15-minute hold with at least 10 feet of water head. Document starting pressure, ending pressure, elapsed time, and any visible water emergence at the surface.
Dye testing is the simplest confirmation tool for suspected exfiltration or connection issues. Hydrostatic testing provides quantifiable leak severity data useful for insurance documentation and repair scope decisions. Both require isolating sections of an active sewer system, so flow shutdown coordination is necessary. Hydrostatic testing may not be feasible on all pipe materials without specialist oversight.
How to Interpret the Results
Misreading inspection findings is as consequential as missing them. Underreacting to a moderate defect allows progressive failure; overreacting to a normal condition wastes remediation budget. Each method produces different evidence — match your response to what the method actually shows.
Normal / No Defect Found
- CCTV shows clean pipe walls, intact joints, no visible infiltration or root intrusion
- Smoke dissipates uniformly with no unexpected surface exits
- Dye traces only to the intended downstream point
- Pressure holds within acceptable tolerance for the pipe specification
Action: Document findings, update the inspection log, and schedule the next routine inspection based on the property's pipe age, material, usage load, and blockage history.
Minor Issues
- CCTV reveals hairline cracks, surface scaling, minor root tendrils at joints, or slight offset without active infiltration (PACP grades 1–2)
- Smoke shows minimal seepage at a single fixture with no ground-surface emergence
- Pressure test shows a marginal drop within tolerable range
Action: Schedule a licensed plumbing contractor for targeted repair or pipe lining within 30–90 days. Increase monitoring frequency.
Active Leak Confirmed / Out-of-Spec Findings
- CCTV shows active groundwater infiltration, structural collapse, large root mass, significant offset joints, or visible void areas (PACP grade 4–5)
- Smoke exits from multiple ground surface points or enters the building interior through unconnected fixtures
- Pressure test shows rapid or substantial loss
- Dye appears at unintended locations
Action: Restrict non-essential water use in the affected zone. Barricade structurally compromised areas. Engage a licensed sewer contractor immediately.
When sewage has reached building structure or surrounding soil, pipe repair alone is not enough. Under IICRC S500, this is a Category 3 water loss: raw sewage contaminating building materials requires extraction, decontamination, and structural drying before any reconstruction begins.
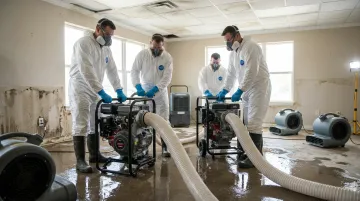
Respond Property Solutions serves commercial properties across Southern California and Arizona with the full scope of response that Category 3 losses require:
- Sewage extraction and structural drying per IICRC S500
- OSHA-compliant biohazard decontamination
- Xactimate-compatible documentation with direct insurer coordination
One project manager carries accountability from the first call through final walkthrough, with no handoffs between teams.
Safety and Best Practices
Sewer inspection involves real hazards. These are non-negotiable requirements, not recommendations.
Confined Space Compliance:
- OSHA 29 CFR 1910.146 requires a permit-space program for any space that meets the permit-required criteria — including sewer manholes and vaults
- Atmospheric testing must occur before entry, in this order: oxygen level, flammable gases/vapors, then toxic air contaminants
- Hazardous atmosphere thresholds: oxygen below 19.5% or above 23.5%; flammable gas above 10% of LFL
- A trained attendant must remain at the surface throughout any confined space entry
Gas exposure is where confined space entries go wrong fastest. H₂S in particular demands calibrated monitoring — not a smell check.
Hydrogen Sulfide (H₂S) Exposure Limits:
- OSHA sets an H₂S ceiling of 20 ppm for general industry, with a peak exposure of 50 ppm
- NIOSH places the IDLH (immediately dangerous to life or health) threshold at 100 ppm
- Olfactory fatigue sets in at that same concentration — you cannot rely on smell to detect dangerous levels
- Calibrated gas monitoring equipment is required before and during entry; smell alone is not a safety control
PPE Requirements for All Personnel:
- Waterproof nitrile or rubber gloves
- Liquid-repellent or rubber-coated coveralls
- Rubber boots
- Safety glasses or splash-proof face shield
- Respiratory protection selected based on exposure assessment — H₂S IDLH conditions are not controlled by filtering facepieces alone
Equipment Decontamination:
All cameras, rods, plugs, and gauges must be cleaned and decontaminated after each inspection segment. This prevents cross-contamination between pipe sections and protects personnel handling equipment after the inspection is complete.
Frequently Asked Questions
What is the most accurate sewer line leak detection method for commercial properties?
CCTV video inspection combined with hydrostatic pressure testing offers the highest diagnostic accuracy. CCTV visually confirms defect locations and pipe condition, while pressure testing quantifies leak severity, giving a complete picture for large commercial systems and producing the documentation needed for insurance claims.
What are the three main sewer line leak detection techniques for commercial properties?
The three primary methods are CCTV video inspection, smoke testing, and dye/hydrostatic pressure testing. Each addresses a different diagnostic scenario: CCTV identifies visual pipe defects, smoke testing reveals breach points and cross-connections, and hydrostatic testing confirms pressure integrity.
What are the early warning signs of a sewer line leak in a commercial building?
Key indicators include persistent sewer odors in restrooms or mechanical rooms, slow or gurgling drains across multiple fixtures simultaneously, unexplained wet spots or soil settlement near sewer line routes, and unexpected spikes in municipal sewer usage charges.
Can a sewer line leak be detected without digging?
Yes. CCTV inspection, smoke testing, and hydrostatic/dye testing are all non-destructive methods that locate leaks without excavation. Digging is only required once the leak location is confirmed and the physical pipe repair begins.
How often should commercial sewer lines be inspected?
Frequency should be risk-based, not fixed to a universal schedule. High-grease-load properties like food service and hospitality need more frequent checks; buildings older than 30 years or with a root intrusion history require closer monitoring. Let condition ratings from prior inspection reports drive your next interval.
What should property managers do immediately after a sewer leak is confirmed?
Take these steps right away:
- Restrict access to the affected area
- Contact a licensed sewer contractor for isolation and repair
- Notify your insurance carrier promptly
- If sewage has reached the building structure, engage a commercial restoration company immediately
- Preserve all inspection documentation (CCTV footage, pressure test records, photographs) as evidence for the claim